Raspberry Pi for research labs (1)

1 min read

Raspberry Pi for research labs (3)
Raspberry Pi for research labs (2)

Raspberry Pi is a mini and incredibly cheap PC. The size is like a credit card, and the price is $35. See how small it is compared to my hand.

If you connect Pi with a TV (or monitor), a keyboard, a mouse, an internet cable, a SD card, then it becomes a full fledged PC. Pi is ideal for students to learn computer languages and other educational purposes. But many people are very creative in using Pi as a digital photo frame, a media center, a internet radio station etc. Pi’s performance is like a a 300MHz Pentium 2.

Can Pi be used in human behavior and brain imaging research labs?  Our specific goal is to see if we can integrate Pi in our Near Infrared Spectroscopy (NIRS) research. In this first part of experiment, we will see if we can get Pi running at all as a regular computer.

Joe in our lab and I rush into Fry’s to purchase some items needed to run Pi:

  1. Power adapter. Yes, Pi needs power. The adapter is actually identical to my smartphone (android) charger.
  2. SD card and reader. It is like the hard disc of a regular computer and is where data (including OS) is saved.
  3. HDMI to VGA adapter (to connect to a monitor)
  4. We already have a monitor, a USB mouse, and a USB keyboard.
1. let’s format the SD card and put OS in.
I am using a Windows computer so I follow the following instructions.
  1. Download the SD Association’s Formatting Tool from
    https://www.sdcard.org/downloads/formatter_4/eula_windows/
  2. Install and run the Formatting Tool on your machine
  3. Set “FORMAT SIZE ADJUSTMENT” option to “ON” in the “Options” menu
  4. Check that the SD card you inserted matches the one selected by the Tool
  5. Click the “Format” button
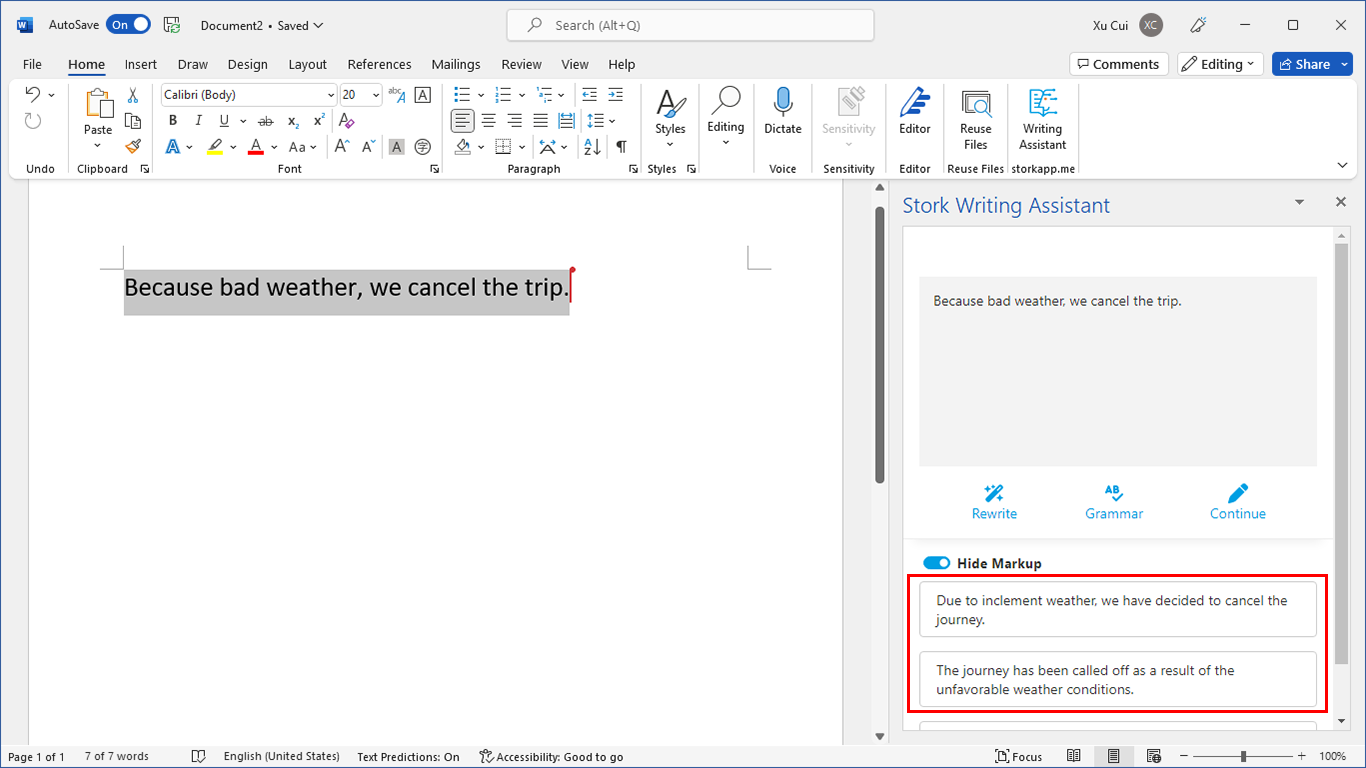
Then download NOOBS software from http://downloads.raspberrypi.org/noobs. It is a zip file, extract it and put the contents to the formatted SD card. Note, put the contents inside NOOBS_v1_3 folder to the SD card, but not the NOOBS_v1_3 folder itself.
2. Connect hardware to Pi.
Plug in the SD card to Pi, connect keyboard and mouse, HDMI to VGA adapter (then to monitor), Ethernet cable, and power adapter. As soon as you connect the power adapter, Pi will start to run. We have an option to select which OS to run, and we selected Raspbian, a version of Linux.
A close view of the hardware connected to Pi.
A far view of Pi and the keyboard/mouse, monitor etc. You can see the big juicy raspberry on the screen.
3. Surfing internet
Looks like it’s ready. Now let’s do something real – surfing internet. I opened Midori (a web browser) and can successfully go to any website I like.
Conclusions:
We successfully set up Raspberry Pi as a computer running Linux. The next step is to see if we can use it for research purpose.


写作助手,把中式英语变成专业英文


AI writing papers with real references


Want to receive new post notification? 有新文章通知我

第七十期fNIRS Journal Club视频 李日辉团队

Youtube: https://youtu.be/tpP3Cge6T0M 优酷:https://v.youku.com/v_show/id_XNjUxNzc2Njc4OA==.html?playMo
Wanling Zhu
28 sec read

第七十期fNIRS Journal Club通知2026/3/7, 10am 李日辉团队

传统fNIRS测量由于通道距离单一,干扰源多,存在空间分辨率不足,信号有效成分低的缺点。来自澳门大学的李日辉团队将分享基于多距离、高密度fNIRS的DOT成像技术,并通过单脑运动和双人社交互动范式验证
Wanling Zhu
22 sec read

第六十九期fNIRS Journal Club视频 赵伟华课题组

Youtube: https://youtu.be/VKMgJT9oESI 优酷: https://v.youku.com/v_show/id_XNjUxMzkzOTkyNA==.html?playM
Wanling Zhu
17 sec read

Leave a Reply

Your email address will not be published. Required fields are marked *